Deadlift 101: The Do’s and Don’ts
The Deadlift is one of the most popular lifts for any rugby player. The power output that is involved in the deadlift will help strengthen your back, legs and core. This will transfer to the pitch in your ability to maximise the force you put through the ground, resulting in better acceleration, speed and power in the tackle and scrum. So if you’re not deadlifting, you should be.
The deadlift seems rather simple, really. Picking up a set load in one fluent movement to a standing position and then putting it back down under control. In reality, there are many components to a successful deadlift, and it’s important to take note of them before attempting one. You must take into account your own personal fitness and strength levels, as well as make sure you understand the complex setup and technique before you even step up to the bar. There are many components to a successful deadlift, and it’s important to take note of them before attempting one.
These factors do differ from person to person, so this article will cover the general outline of a deadlift and hopefully give you the information needed to apply it to your own deadlift regimen. As a coach that has taught hundreds if not thousands of people through the deadlift, I can tell you from anecdotal evidence that no two lifters are the same, and tailoring your technique to your own personal standards is definitely necessary.
Despite this, there are certainly generalisations that you can use as a starting point in order to begin deadlifting. Even if you currently do deadlifts you may find small things within this article that may be of use to you in your endeavour for a kick ass deadlift.
How To Perform the Deadlift
The following information is aimed to walk the reader through the conventional style deadlift from start to finish. If you are a beginner, remember to start on a low weight and work your way up.
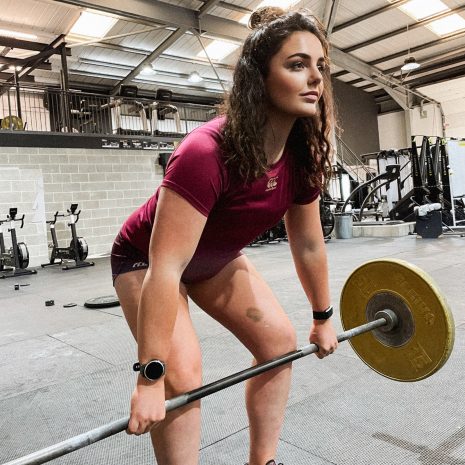
Start Position
- Approach the bar and place feet hip width apart, approximately 1in from touching the bar
- Flexing at the hip, bend down to grasp the bar with a double overhand grip on the outer sides of the legs (you can use an over/under grip if required which may improve grip strength).
- The shoulders should be slightly in front of the bar and the hips slightly higher than the knees.
- By pulling the bar into the shins, pull the shoulder blades backwards and downward to attain a high chest position which in turn straightens the back into neutral.
- Take a deep breath into the abdominal cavity and brace the abdominals in order to promote intra-abdominal pressure.
- Take the tension out of the bar by slightly pulling the bar into the body.
- You are now ready to lift.
The Lift
- Pull the bar into the body and drive with the legs keeping the shoulders back and the chest high at all times.
- Once the bar passes the knees, focus on pulling the bar up the thighs by pushing the hips forward.
- Focus on locking the glutes into place and tightening the abdominals in order to attain a lockout but not a hyperextension of the spine which may be dangerous.
The Descent
- Pushing the hips back, keep the bar as close to the body as possible
- Once the bar passes the knees slowly push the hips down until the bar touches the floor.
- Either re-set and lift again if completing a set or rest.
Common Mistakes
With any exercise, it is important to ensure that they are executed safely. Now that we have gone through the deadlift from start to finish, it is good to remember if and where to look for things that may go wrong and how to best avoid them.

Getting the Set Up Wrong
This cannot be stressed enough: the setup is the most important part of the lift. If you fail to get your setup correct you effectively set yourself up for failure during the lift. So work on your setup technique and perfect it. Make sure you know where your feet are meant to be, exactly where your hands are meant to be and your exact position of hips, knees, shoulders and chest. It should become like second nature and when you are in the correct position it just feels right.
Here are some tips for keeping that position in check:
- Make sure your feet are the right distance apart. If they are too wide, you won’t be able to push your knees out properly and too narrow you will feel unstable. Around hip width or slightly wider seems to work best.
- Make sure you keep your knees out. Ensuring your knees are pointing outwards will allow you to activate the glutes and hamstrings effectively making you stronger and safer to lift.
- Grip Width. Make sure it’s not too wide as it will make it more difficult to hold, harder on your back and promote an even greater range of movement making it all around more difficult. On the other hand, don’t grip too narrow either as it will pull your shoulder blades apart making it difficult to maintain a neutral spine.
- Bracing – The big one. In the set position it is critical to brace the abdominals in order to support the spine before pulling the bar.
Going Too Heavy and Too Often
This point could be said for most exercises in the gym and we’re all guilty of it at one point or another. We all love to say that we deadlift X amount of weight no matter what it took to lift it. I learned early on in my lifting career that this just ends up with you getting hurt. Completing good quality reps with a weight that you can safely do so will only add to your performance. Going too heavy however will only lead to a breakdown in form resulting in a possible injury. Work hard, but be mindful of your form and keep the showing off to a minimum.
It was only when I got hurt from a bad deadlift that I decided to drop it back and focus on form. Listening to more and more coaches on the matter you will notice a trend amongst them – they rarely max out. This means that they will only rarely test their 1 rep max to see what their strength is then work off of that weight through the art of periodisation (another article entirely) which ensures that they increase by small increments in load each week/training block and they rarely miss a lift. This will gradually increase your strength and performance and also keep your form correct. Work hard, but be mindful of your form and keep the showing off to a minimum.
Locking Out Wrong
So you’ve done the basics; you’ve set up properly, you’ve got the bar nearly to the top safely and BOOM you lock out. What does locking out mean, you say? It should mean that you have brought the bar up to the top, your glutes and your abdominals are contracted and you are in a fully standing position.
What can happen sometimes is that when people lock out but use the lower back to pull themselves into a lockout, they actually end up hyperextending the back and placing an unnecessary amount of force through the lumbar vertebrae in the back. This can lead to painful injury and should be avoided by engaging the abdominals at the front which will prevent you from leaning back too far.
“Progressing” too quickly
Too many rugby players (and coaches for that matter) are premature with their progressions in deadlifts. The ego usually takes over and people get carried away with “getting strong” which results in their form being compromised and the potential of an injury increasing. This is the time where you are forced to kick the ego to the side and focus on what matters – technique.
Start with a broomstick. That’s right, a broomstick. It may not be “Alpha” to start throwing a broomstick/plastic tube about but it will pay off in the long run. Get the connection to the movement first followed by adding load second. Think of it like building a house, first you need to draw the plans and lay the foundations, then you can finally begin to build the house. The work in the beginning is by far the most important part otherwise the house will fall. Do the work, reap the benefits.
Variants of the Deadlift
The deadlift is one of the big staples of any exercise program, but it’s not the only one. There are many variants which offer huge benefits and can even assist in achieving a bigger deadlift. A well rounded program has its fair share of variations and accessory lifts to supplement the big lifts.
Sumo Deadlift – A sumo deadlift is simply a wide stance deadlift with the hands placed on the inside of the legs. This variation may offer hip dominant lifters greater strength due to the amount of force placed through the hips and the lower starting position means less potential spinal loading.
Stiff Leg Deadlift/Romanian Deadlift – These Variations are simply a part of the deadlift starting from the top position and only coming down to just above or just below the knee. This places a greater emphasis on the Hamstring/Glute region without recruiting the quads too much.
Straight Leg Deadlift – Like the stiff leg deadlift and the RDL, the straight leg deadlift is partial range of movement and more focused on the hamstrings. However, this lift may place a significant amount of stress through the hamstrings and knees so unless someone possesses a great amount of strength and flexibility I would approach this one with caution.
Trap Bar Deadlift – A trap bar is a hexagonal bar and allows users to begin the lift in a more upright position leading to less stress on the lower back.
These variations are only a small insight into the vast degree of variations that can be performed when deadlifting.
To Belt or Not to Belt? That is the Question.
You will frequently see guys and girls wearing a belt when lifting and specifically deadlifting. Aside from the obvious case of it making them look like they are serious about lifting, there are some genuine benefits to using a belt.
Intra-abdominal pressure discussed previously can be facilitated by providing added security and support surrounding the spinal column. Due to the fact the spine is a highly unstable structure it is left to the abdominal muscles to provide the structural stability by contracting to promote a corset-like security around it. A belt therefore enhances the ability of the abdominals to provide pressure to the abdominal cavity and then in turn the spine by acting as a barrier to the protruding abdominals.
There have been long discussions regarding whether lifters should/should not wear belts when training but you will rarely see an athlete “maxing out” a deadlift without the aid of a belt. Aside from the obvious case of it making them look like they are serious about lifting, there are some genuine benefits to using a belt.
Advanced lifters won’t necessarily depend on a belt but recognise it as a helpful aid in the attainment of abdominal pressure to make a lift safer.
Would I recommend using a belt? For a beginner/novice lifter – no, but for an intermediate/advanced lifter that was pushing their physiology to the limit then it’s not a bad idea. I would only recommend the belt once a lifter starts to work up to around 70% of their maximum effort as they should possess more than enough strength in the abdominal region to overcome most loads,. If they don’t, then I would not recommend trying to push it until they have built up the strength and control required.
Other Deadlift Tips
Chalk – Using chalk will allow the athlete to attain a better grip on the bar and eliminate moisture from their grip. This ensures that the athlete focuses on the movement rather than worrying about their grip all the time.
Straps – The same can be said for lifting straps as using these will help the athlete keep a grip of the bar the whole time relatively worry free of dropping it. I wouldn’t recommend using them all the time, however. As is true with the belt, there is a time and a place for lifting straps.
In order to conclude this article, it is important to remember some key points.
- The deadlift is one of the main lifts that people should focus on when training.
- Like all great things, it takes a lot of patience and hard work to master.
- It can prevent and rehabilitate many sports related injuries when executed properly
- It is highly individual therefore you must fine tune the deadlift process to your own unique requirements.
There you have it, Deadlift 101. This article is designed to give you the necessary tools in order to attack the deadlift with confidence and improve above your current level. Furthermore, although this article covers the main points related to deadlifting, working with a coach will always benefit you in understanding and breaking down the deadlift to suit you. It’s also helps to have someone take an outside view of your form to ensure your executing the lifts safely. If you do not have access to a coach, then make sure to take your time to video your lifts in order to view and assess where you are getting it right or wrong and correct accordingly.
The author, Dean Robertson MSc BSc (Hons), is an Edinburgh based coach that owns Elysium Personal Training. He coaches a wide range of individuals looking to change their performance, lifestyle, or aesthetics. He can be contacted via email at elysiumpt@outlook.com or Facebook via the “Elysium Personal Training” page.
Comments